
BMX chains play a crucial role in the performance and safety of your bike. An optimal chain tension ensures smooth pedaling and minimizes the risk of mechanical failure. Whether you are racing or cruising through the trails, understanding the right amount of tightness can significantly affect your riding experience and bike longevity.
The ideal BMX chain should be neither too tight nor too loose. A properly adjusted chain maintains efficiency, enhances power transfer, and extends the lifespan of both the chain and other components. Striking the right balance is essential for peak performance and avoiding unnecessary wear and tear.
Maintaining the correct chain tension can help riders enjoy a more efficient ride while reducing the risk of damage. A chain that is too tight can strain the bike’s drivetrain, leading to costly repairs, while a loose chain can derail, causing accidents or performance issues. Regular checks and adjustments are vital to ensuring your BMX bike performs at its best.
Chain Basics
Purpose of a BMX Chain
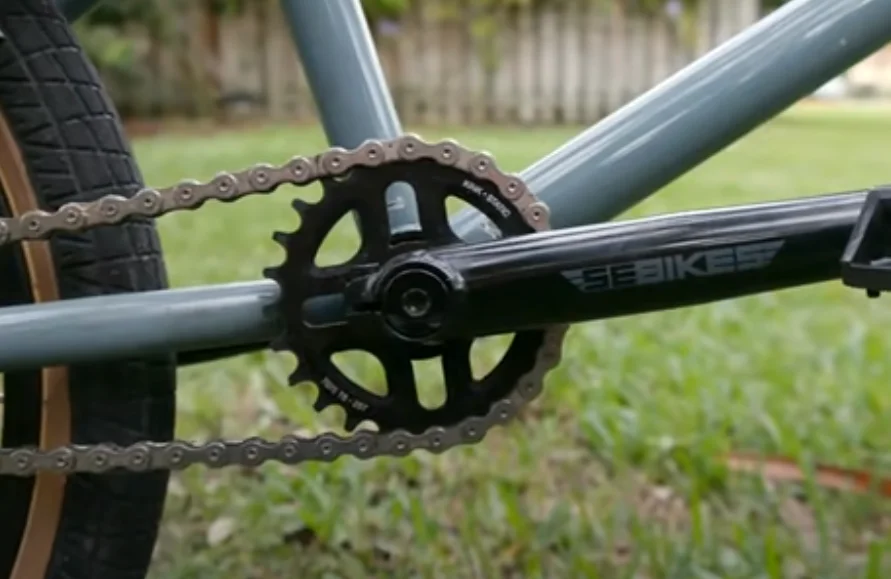
A BMX chain is essential for transferring power from the pedals to the rear wheel. This crucial component ensures that your bike operates smoothly and efficiently. When you pedal, the chain moves around the front and rear sprockets, propelling the bike forward. Proper chain function also affects acceleration and top speed, making it vital for both racing and recreational riding.
In addition to power transfer, a well-maintained chain contributes to the overall health of your BMX bike. A loose or damaged chain can lead to a series of problems, including poor shifting, increased wear on the sprockets, and even accidents. Regular checks and adjustments help ensure that the chain performs optimally, providing a safer and more enjoyable ride.
Types of BMX Chains Available
BMX chains come in various types, each designed for specific styles of riding. The most common types include:
- Standard Chains: These are versatile and often used for general riding. They offer a good balance between strength and weight.
- Half-Link Chains: Ideal for riders looking for precise adjustments in chain length. They consist of half links, allowing for a more customized fit without the need for additional links.
- Single-Speed Chains: These chains are lightweight and designed for single-speed setups. They are suitable for racing and tricks, where weight reduction is essential.
- Heavy-Duty Chains: Built to withstand the rigors of BMX riding, these chains are thicker and more robust, perfect for riders who frequently engage in tricks and jumps.
Choosing the right chain type can significantly impact your bike’s performance. It’s essential to consider your riding style and the demands you place on your BMX when selecting a chain.
Ideal Chain Tension
Explanation of Optimal Chain Tightness
The optimal chain tension for a BMX bike strikes a balance between being too tight and too loose. A correctly tensioned chain should allow for slight movement—approximately half an inch—when pressed down. This tension helps maintain proper engagement with the sprockets, ensuring smooth power transfer.
A loose chain can cause skipping or derailment, making riding unsafe. Conversely, a chain that is too tight can strain the drivetrain, leading to premature wear and potential mechanical failure. Regularly checking and adjusting chain tension can prevent these issues and enhance your riding experience.
Effects of Both Loose and Tight Chains
A loose chain can lead to several problems:
- Skipping Gears: A loose chain may not engage properly with the sprockets, resulting in skipped gears while pedaling. This can be frustrating and unsafe.
- Derailment: An excessively loose chain can fall off the sprockets, especially during jumps or sharp turns, increasing the risk of accidents.
- Increased Wear: A loose chain puts additional strain on other components, leading to quicker wear on the sprockets and overall drivetrain.
On the other hand, a tight chain can also cause issues:
- Mechanical Strain: An overly tight chain can create stress on the pedals, bottom bracket, and rear hub. This strain can lead to failure and costly repairs.
- Reduced Performance: A tight chain can hinder smooth pedaling, making it harder to accelerate and maintain speed.
Maintaining the right tension is crucial for a safe and efficient ride. Regular checks and adjustments will ensure optimal performance.
Measuring Chain Tension
Tools Needed for Measurement
To measure your BMX chain tension, you will need a few simple tools:
- Ruler or Measuring Tape: This helps measure the amount of slack in the chain.
- BMX Tool: A specific tool designed for BMX maintenance can assist in making adjustments if needed.
- Wrench: Use a wrench to adjust the rear axle if necessary.
Having the right tools on hand makes the measurement process quick and easy.
Step-by-Step Guide to Measuring Chain Tension
Measuring chain tension is straightforward. Follow these steps:
- Step 1: Position Your Bike
Place your BMX bike on a stable surface, ideally in a repair stand. Ensure it is secure. - Step 2: Locate the Chain
Identify the section of the chain where you want to measure tension, typically in the middle of the chain. - Step 3: Press Down
With one hand, press down on the chain between the rear sprocket and the chainring. Apply light pressure to create slack. - Step 4: Measure the Slack
Using your ruler or measuring tape, measure how much the chain moves. The ideal movement should be about half an inch. - Step 5: Assess the Tension
If the movement is more than half an inch, the chain is too loose. If there is no movement, it may be too tight.
Regularly measuring chain tension ensures your BMX bike remains in optimal condition.
Adjusting Chain Tension
Methods to Tighten the Chain
If your BMX chain is too loose, adjusting the tension is necessary. Here are some methods to tighten the chain:
- Adjusting the Rear Wheel Position: Most BMX bikes have adjustable dropouts that allow you to slide the rear wheel forward, reducing slack in the chain.
- Using Half-Link Chains: If you have a half-link chain, you can easily add or remove links to achieve the desired tension without moving the rear wheel.
Common Tools for Adjustment
For adjusting the chain tension, you may need:
- Wrench: To loosen and tighten the rear axle nuts.
- Allen Keys: For bikes with specific bolt configurations.
- Chain Tool: If you need to add or remove links.
Having these tools handy simplifies the adjustment process and ensures a proper fit.
Troubleshooting Common Issues During Adjustment
While adjusting chain tension, you may encounter some common issues:
- Stubborn Axle Nuts: Sometimes, the axle nuts may be difficult to loosen. Apply penetrating oil and give it a moment to work before attempting again.
- Chain Misalignment: After adjusting, ensure the chain is properly aligned with both sprockets. Misalignment can cause skipping or derailment.
- Over-Tightening: Be cautious not to over-tighten the chain. Recheck the tension after adjustment to ensure it is within the ideal range.
Taking the time to troubleshoot these issues will lead to a smoother riding experience and prolong the life of your BMX bike components.
Signs of Incorrect Tension
Indicators of a Loose Chain
A loose chain can cause several issues that impact the performance and safety of your BMX bike. Here are key indicators that your chain may need tightening:
- Skipping Gears: One of the most common signs of a loose chain is gear skipping. When you pedal, the chain may slip over the sprockets, making it difficult to maintain a steady pace.
- Rattling Noises: If you hear a rattling noise while riding, this could indicate that the chain is not properly tensioned. The noise is often caused by the chain bouncing against the sprockets.
- Frequent Chain Drops: A loose chain can easily fall off the sprockets, especially during jumps or sharp turns. If you find yourself constantly picking up your chain, it’s time to check the tension.
- Excessive Movement: When you press down on the chain, it should only move slightly. If you notice more than half an inch of slack, your chain is likely too loose.
Addressing these issues promptly will enhance your riding experience and prevent further damage to your bike.
Symptoms of an Overly Tight Chain
An overly tight chain can also lead to serious problems. Look out for these symptoms:
- Hard Pedaling: If you feel resistance when pedaling, your chain may be too tight. This resistance can lead to fatigue during rides.
- Strain on Components: An excessively tight chain puts stress on the bottom bracket and rear hub. You may notice unusual wear patterns or noises from these components.
- Chain Wear: If you observe signs of rapid wear on your chain and sprockets, the tension might be too tight. This can result in the need for early replacement.
- Loss of Speed: A tight chain can affect your bike’s performance, making it harder to accelerate. You may find that your bike doesn’t respond as quickly as it should.
Regular checks will help you identify these symptoms early and keep your BMX bike running smoothly.
Maintenance Tips
Regular Checks for Chain Tension
Regular checks for chain tension are vital for maintaining your BMX bike. Here’s how to incorporate this practice into your routine:
- Check Before Rides: Make it a habit to check your chain tension before every ride. This simple step can prevent potential issues during your ride.
- Inspect After Jumps or Tricks: If you often perform jumps or tricks, inspect the chain tension afterward. The impact can loosen the chain.
- Schedule Weekly Checks: If you ride frequently, consider checking the chain tension at least once a week. This ensures that any changes are addressed promptly.
By making regular checks a part of your routine, you’ll enhance your bike’s performance and longevity.
Lubrication and Care for Longevity
Keeping your chain well-lubricated is essential for its longevity and performance. Follow these tips for proper lubrication:
- Choose the Right Lubricant: Use a quality bike chain lubricant designed for BMX chains. This will help reduce friction and prevent wear.
- Apply Sparingly: A little goes a long way. Apply a small amount of lubricant to the chain while pedaling backward. Ensure the lubricant gets into the rollers and links.
- Wipe Off Excess: After applying, use a cloth to wipe off any excess lubricant. This prevents dirt and grime from accumulating on the chain.
- Regular Lubrication: Make it a point to lubricate your chain every few rides, especially after riding in wet or dirty conditions.
Regular lubrication will keep your chain functioning smoothly and help avoid unnecessary wear.
Best Practices for Chain Maintenance
Adopting best practices for chain maintenance can enhance your riding experience. Here are some helpful tips:
- Keep It Clean: Regularly clean your chain to remove dirt and grime. Use a chain cleaning tool or a brush with degreaser for effective cleaning.
- Inspect for Damage: Periodically check for any signs of wear, such as rust or stretched links. Addressing these issues early can prevent bigger problems.
- Monitor Chain Length: Ensure your chain length is appropriate for your bike. If it’s too long or too short, it can affect performance and safety.
- Store Properly: When not in use, store your bike in a dry place. Avoid leaving it outside, as exposure to the elements can cause premature wear.
Incorporating these practices into your routine will extend the life of your chain and improve your overall riding experience.
Chain Replacement
When to Consider Replacing the Chain
Knowing when to replace your BMX chain is crucial for maintaining your bike’s performance. Here are some signs that indicate it’s time for a replacement:
- Stretched Chain: Chains naturally stretch over time due to wear. If you measure your chain and find it has stretched beyond the acceptable limit, it’s time to replace it.
- Frequent Breakage: If your chain is breaking often, it’s a clear indication that it’s time for a new one. This could result from fatigue and wear.
- Poor Performance: If you notice decreased performance in terms of skipping gears or loss of speed, replacing the chain may solve the problem.
- Visual Damage: Inspect your chain for visible signs of damage, such as rust or bent links. Any significant damage warrants a replacement.
Replacing the chain at the right time can save you from more extensive repairs in the long run.
Signs of Wear and Tear to Look For
When inspecting your chain for wear, keep an eye out for these specific signs:
- Rust or Corrosion: Any signs of rust indicate that the chain has been exposed to moisture and needs replacing. A rusty chain can compromise performance and safety.
- Stretched Links: If the links appear elongated compared to new ones, it’s a sign of wear. Use a chain checker tool for accurate measurement.
- Bending or Kinking: If you notice any links bending or kinking, it’s time to replace the chain. This can lead to failure during a ride.
- Uneven Wear: Check for uneven wear patterns on the teeth of your sprockets. If you see significant wear on one side, it may indicate that the chain is worn out and needs replacing.
Regular inspections will help you catch wear and tear early, allowing for timely replacements and a smoother ride.
Frequently Asked Questions
How do I know if my BMX chain is too tight?
To determine if your BMX chain is too tight, perform a simple tension check. Spin the pedals while observing the rear wheel; if the wheel doesn’t turn smoothly or feels resistant, the chain may be overly tight. Additionally, check for any signs of bending or excessive strain on the derailleur. It’s essential to allow some slack; ideally, there should be about half an inch of movement in the chain when pressed down. If you’re in doubt, consulting a professional can provide clarity and ensure your bike remains in optimal condition.
What are the signs of a loose BMX chain?
A loose BMX chain can present several warning signs. If you hear a rattling noise while pedaling or notice that the chain skips over the sprockets, it’s a clear indication of excessive slack. Other signs include the chain frequently coming off the sprockets during rides and noticeable vibrations in the pedals. Maintaining the appropriate tension is crucial; regular checks can prevent potential accidents and mechanical issues, ensuring a smooth and safe riding experience.
How often should I check my BMX chain tension?
Checking your BMX chain tension should be part of your regular bike maintenance routine. Ideally, inspect the chain tension every few rides, especially after intense sessions or if you notice any changes in performance. Environmental factors such as dirt, mud, and weather can impact the chain’s condition. Additionally, if you frequently adjust your bike’s gearing or have recently installed a new chain, it’s wise to check the tension more often. Keeping an eye on this will help prolong the life of your chain and enhance your overall riding experience.
Conclusion
Proper chain tension is a fundamental aspect of BMX maintenance that significantly affects your bike’s performance. A well-maintained chain ensures smooth rides, enhances durability, and minimizes the risk of mechanical failures. Regularly checking and adjusting your chain will contribute to a safer and more enjoyable riding experience.
Investing time in understanding how tight your BMX chain should be can prevent costly repairs and enhance your overall cycling performance. A simple routine of checks and adjustments will keep your bike in optimal shape, allowing you to focus on what you love most—exploring new trails and enjoying your rides.